Volirium P1
https://manuals.volirium.com/wiki/P1:User_manual
https://www.volirium.com/en/volirium/
This is the first Volirium P1 screen. It is a screen mostly dedicated to
thermaling. It has an instantaneous vario on the upper left side and an
averaging vario (set to 20 seconds) on the upper right. My altitude in feet is
displayed below the averaging vario.
The name of my next turnpoint and distance to it form a row just below the
vario. The turnpoint could be the starting point so I'll know if I am inside the
exit cylinder.
The wind direction and speed are side by side in the two fields below my next
turnpoint values.
My altitude relative to the zero point that I set when I touched this field on
launch is to the right of the wind speed value. My ground speed is shown on the
bottom between the two screen scrolling arrows.
The altitude is the
pressure / barometric altitude above mean sea level. I can adjust the altitude for
my launch GPS altitude or it will be done automatically,
https://manuals.volirium.com/wiki/Connect_1:Altitude_adjustment
Wind speed is determined by algorithm which Steve Kroop says he assumes is the
same as the Element Track (which he believes is an improved algorithm over the
6030).

I can choose which variables to display in each of the fields just by touching
the field and choosing which variable I want displayed there.
https://manuals.volirium.com/wiki/P1:Flight_screen_config
I can also configure each variable, for example, choosing the time interval for
the averaging vario. This is the original layout from a new P1:

For take-off, you might wish to lock the screen, which is done by simultaneously
pressing the + (the right key) and home or return key (the middle key).

A locked screen is symbolized by a lock in the status bar.
In flight, the screen lock can be released by pressing any key.
It is possible to have up to six Volirium P1 screens.

The Flytec 6030 has up to
three and the Oudie has two. I basically use only two on the Flytec 6030, one
for final glide to goal and one for pretty much everything else (although I do
have one dedicated to the start cylinder). On the P1 I can
decide which of the six screens to display and how many of them to display. With
fewer screens I have to do less scrolling to get to the appropriate screen. The
left and right arrows are the scrolling arrows.
https://manuals.volirium.com/wiki/P1:Flight_screen_config
This is the second screen and the averaged vario and the instantaneous vario are
displayed with large character sizes. I also see the altitude and the relative
altitude. This screen is obviously focused on thermaling and making sure
that I can see just how well or poorly I am thermaling.

The original configuration:

This third screen focuses on the wind direction and speed. It includes my
averaged and instantaneous vario as well as my next turnpoint name. distance and
required glide ratio to get to it. This required glide ratio can be compared
with my actual glide ratio.

The original configuration:

This is my final glide screen. In the upper left is my glide ratio and to its
right is my required glide ratio to get to goal. In the second row is my
distance to goal and the name of the next turnpoint, which if I am on final
glide would be the name of the goal point.
The distance to the next turnpoint is in the third row below the distance to
goal, so on final glide these should be the same value, and to its right the
required glide ratio to get to the next turnpoint. Therefore this screen can be
used on final glide or to view my progress getting to the next waypoint.
My pressure / barometric altitude above mean sea level, my relative
pressure / barometric altitude above
launch and my averaged vario are in the fourth row. Wind direction, wind speed,
and instantaneous vario make up the fifth row with my ground speed at the bottom.
Unlike with the Flytec 6030 and the Oudie 4, the P1 does not yet compute a wind
component.

The original configuration:

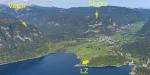
This is the first of two map pages. It focuses on my next waypoint.

The original configuration:

This is the final glide map screen:

The original configuration:

Unlike the Flytec 6030 or the Oudie 4, the P1 does not yet give a predicted altitude
above goal for either best glide speed or current air speed. You do not yet enter a
polar so the P1 does not have any way to calculate these values. It does know
your current glide ratio and the glide ratio required to get to the next
turnpoint or goal, which are independent of your polar.

Without a polar the P1 can't yet provide McCready values and does not use McCready
theory to provide Speed-To-Fly values to the pilot.
My P1 configuration file is found here:
//ozreport.com/data/Galapagos.fcf. Just copy it to the config folder on
your P1. You might want to save your version of that file first.
The future plans for the P1:
Joerg Ewald writes:
For the P1 pitot, we will be using a new sensor that makes physical, electronic
and software integration much easier than the one used in the 6030, with the
same or even better performance.
We ran a pilot project with this sensor, this just completed last week, and we
have now a working prototype of a standalone pitot with that sensor.
The next step will be to integrate the sensor physically into the P1 casing. We
will be working on that over the next 4-8 weeks. This leaves us with the
software integration. Getting current airspeed will be relatively quick. Adding
speed-to-fly functionality will be a big chunk of work. I have no timeline for
that yet, but will certainly work on it as much as possible.
//OzReport.com/1531747917
|